
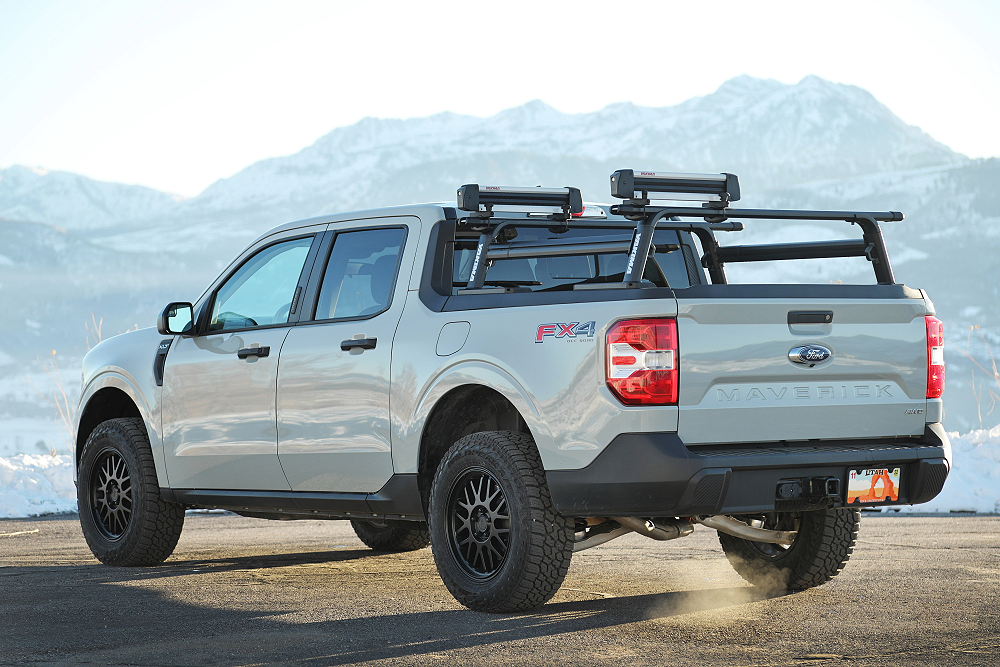
ReadyLIFT® is excited to announce that we now offer an all-new 1.5-inch premium-grade Smart Suspension Technology (SST) Lift kit for the brand new 2022 Ford Maverick™ AWD compact truck. The new 2022 Ford Maverick has quickly become a popular choice for small truck crossover-style enthusiasts. Every adventure-based vehicle performs better when given a quality suspension height improvement to increase ground clearance and provide gracious clearance for larger off-road-inspired wheels and tires.
ReadyLIFT SST Lift Kt #69-22150 is specifically engineered for the all-new 2022 Ford Maverick 2.0L Ecoboost AWD model. The kit utilizes our innovative offset-designed, fabricated heavy-duty steel plate top mount strut extensions to maintain factory alignment geometry for superior performance, ride, and handling even with an additional 1.5” of lift. Factory rear suspension geometry is also retained thanks to our rear spring spacer/sub-frame spacer combination. This kit delivers easy bolt-on installation.
This new Ford Maverick SST Lift Kit maintains the factory driving dynamics while accommodating up to a beefy 245/65-17 tire on a 17×8 wheel with +40 mm offset. (Fitment is stated using Falken Wildpeak A/T3W tire and Motegi Racing MR144 M9 wheels. Minor trimming may be required depending on tire brand and tread design.) This 1.5″ lift system provides a taller stance increasing ground clearance.
FEATURES & BENEFITS:
- Engineered to retain the factory ride and handling (excluding replacement tire ride and handling characteristics).
- Offset design adjusts the position of the front strut to avoid interference and assist with maintaining the natural lifespan of the strut in a leveled configuration.
- Provides 1.5″ of lift for added ground clearance and the ability to run larger wheels and tires.
- Allows for up to a 245/65-17 tire on a 17×8 wheel with +40 mm offset.
- Works with the factory FX4 drive modes.
- Easy to install in 4 hours.
- Not for use currently on 2.5 Hybrid Engine equipped FWD models.

LINK:
RealyLift 2022 Ford Maverick 1.5” SST KIT
ReadyLift Ford Maverick Lift Kit Instructions (.pdf)
INSTALLATION:
READ INSTRUCTIONS THOROUGHLY AND COMPLETELY BEFORE BEGINNING INSTALLATION.
INSTALLATION BY A CERTIFIED PROFESSIONAL MECHANIC IS HIGHLY RECOMMENDED.
READYLIFT IS NOT RESPONSIBLE FOR ANY DAMAGE OR FAILURE RESULTING FROM IMPROPER INSTALLATION.
SAFETY WARNING:
MISUSE OF THIS PRODUCT COULD LEAD TO INJURY OR DEATH.
Suspension systems or components that enhance the on and off-road performance of your vehicle may cause it to handle differently than it did from the factory. Extreme care must be used to prevent loss of control or vehicle rollover during abrupt maneuvers.
Always operate your vehicle at reduced speeds to ensure your ability to control your vehicle under all driving conditions. Failure to drive safely may result in serious injury or death to driver and passengers.
Driver and passengers must ALWAYS wear your seat belts, avoid quick sharp turns and other sudden maneuvers. ReadyLIFT Suspension does not recommend the combined use of suspension lifts, body lifts, or other lifting devices.
You should never operate your vehicle under the influence of alcohol or drugs.
Constant maintenance is required to keep your vehicle safe. Thoroughly inspect your vehicle before and after every off-road use.
It is the responsibility of the retailer and/or the installer to review all state and local laws, with the end user of this product, related to bumper height laws and the lifting of their vehicle before the purchase and installation of any ReadyLIFT products.
It is the responsibility of the driver/s to check their surrounding area for obstructions, people, and animals before moving the vehicle.
All raised vehicles have increased blind spots; damage, injury and/or death can occur if these instructions are not followed.
INSTALLATION WARNING:
All steps and procedures described in these instructions were performed while the vehicle was properly supported on a two post vehicle lift with safety jacks.
Use caution during all disassembly and assembly steps to insure suspension components are not over extended causing damage to any vehicle components and parts included in this kit.
Included instructions are guidelines only for recommended procedures and are not meant to be definitive.
Installer is responsible to insure a safe and controllable vehicle after performing modifications.
ReadyLIFT Suspension recommends the use of an OE Service Manual for model/year of vehicle when disassembly and assembly of factory and related components.
Unless otherwise specified, tighten all bolts and fasteners to standard torque specifications listed within the OE Service Manual.
Suspension components that use rubber or urethane bushings should be tightened with the vehicle at normal ride height. This will prevent premature wear or failure of the bushing and maintain ride comfort.
Larger tire and wheel combinations may increase leverage on suspension, steering, and related components.
Due to payload options and initial ride height variances, the amount of lift is a base figure. Final ride height dimensions may vary in accordance to original vehicle ride height. Always measure the vehicle ride height prior to beginning installation.
IMPORTANT NOTE:
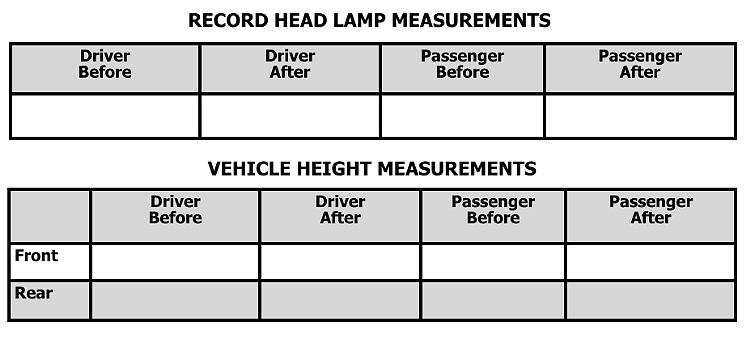
A lifted vehicle may have different headlight aim performance. ReadyLIFT recommends marking and recording the headlight beam position before kit installation and then adjusting, if necessary, the headlamps to the same height settings after kit installation. Set the vehicle on a level surface 10′ to 15’ from a solid wall or garage door. (This is a general distance with some manufacturers requiring different distances.) Note the top height of the low beam’s bright spot, the top of the most intense part of the beam, for driver and passenger side. Height may vary from side to side. Repeat this procedure and adjust after lift kit is installed. Adjust if the aim is off by turning the adjusters gradually (a quarter of a turn) and looking to see where the new alignment falls. It may be easier to block one headlamp while adjusting the other. Consult the owner operation manual for procedures to adjust headlights – many automakers offer headlight aiming specs. Some states have their own specifications when it comes to headlight aim, so it’s best to follow those rules when alighting headlights.
This suspension system was developed using a 245-65/17 tire with 17” x 8” wheel and an offset of +40mm. If wider tires are used, offset wheels may be necessary and trimming may be required. Factory wheels can be used but are not recommended with tires over 9.7” wide. The stock spare rim can be run in an emergency. Please note that if running the spare factory tire, it is done for short distances and a speed not to exceed 45mph or damage to differentials may occur.
BILL OF MATERIALS
QUANTITY / DESCRIPTION
- (2) FRONT STRUT SPACER
- (2) REAR STRUT SPACER
- (2) FRONT END LINK DROP BRACKET
- (4) REAR TRAILING ARM SPACER
- (2) 9.25” FRONT END LINK
- (6) M8-1.25 x 20mm SERRATED-FLANGE HEX HEAD BOLT
- (2) M12-1.75 x 35mm HEX HEAD BOLT
- (2) M12-1.75 FLANGE NUT
- (2) M12 FLAT WASHER
- (4) M14-2.00 x 60mm HEX HEAD BOLT
- (4) M14 FLAT WASHER
- (4) M14 STANDARD LOCK WASHER
WARNING
Before starting installation: ReadyLIFT Suspension highly recommends that the installation of this product be performed by a professional mechanic with experience working on and installing suspension products. Professional knowledge and skill will typically yield the best installation results. If you need an
installer in your area, please contact ReadyLIFT Suspension Customer Service to find one of our “ProGrade” Dealers.
INSTALLATION BY A PROFESSIONAL IS HIGHLY RECOMMENDED.
- A Factory Service Manual for your specific Year / Make / Model is highly recommended for reference during installation.
- All lifted vehicles may require additional driveline modifications and / or balancing.
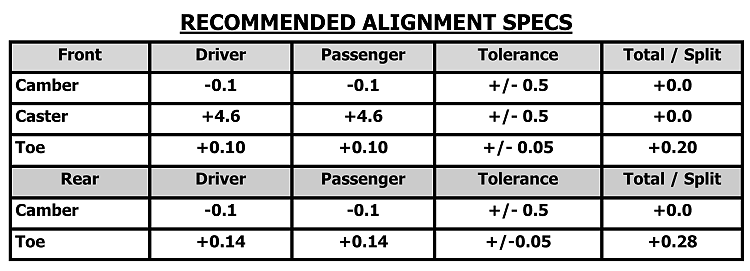
- A vehicle alignment is REQUIRED after installation of this product.
- Speedometer / Computer recalibration is required if changing +/- 10% from factory tire diameter.
- A vehicle lift or hoist greatly reduces installation time. Installation time estimates are based on an available vehicle hoist.
- Vehicle must be in excellent operating condition. Repair or replace any and all worn or damaged components prior to installation.
***Some parts shown in red for picture clarification only.***
ReadyLIFT recommends all steps and procedures described in these instructions be performed while the vehicle is properly supported on a two post vehicle lift with safety jacks. Otherwise, park vehicle on a clean flat surface and block the rear wheels for safety. Engage the parking brake.
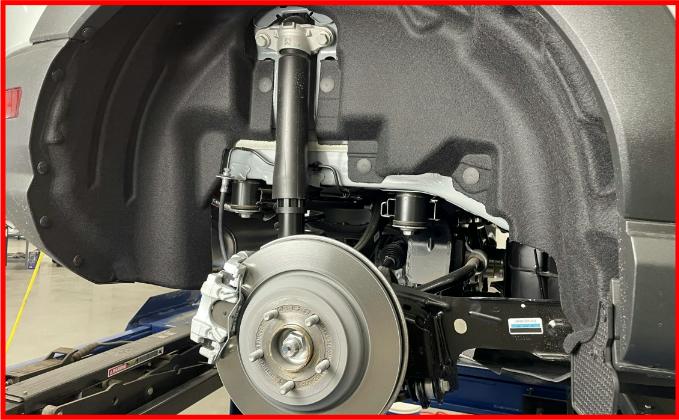
FRONT INSTRUCTIONS
Raise the front of the vehicle and support with safety jack stands on the factory lift points.
Remove the front wheels.
Remove the ABS wire from the body.
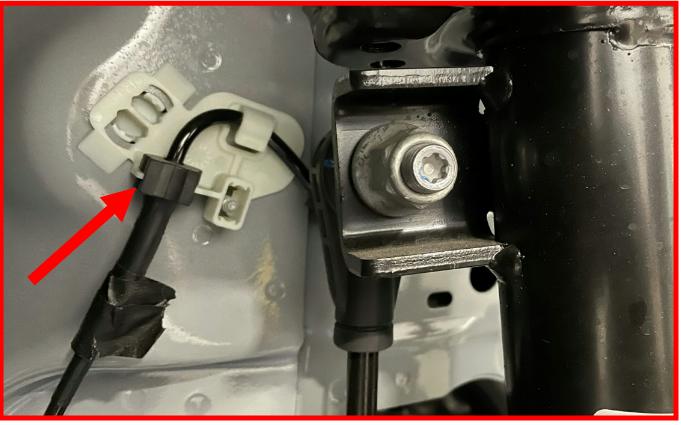
Remove the ABS wire from the strut.
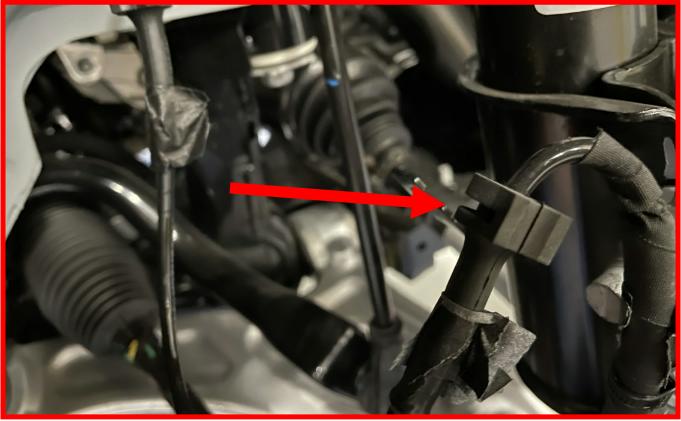
Use a trim removal tool to remove the ABS wire clip from the knuckle.
Remove the brake line bracket with an 8mm wrench.
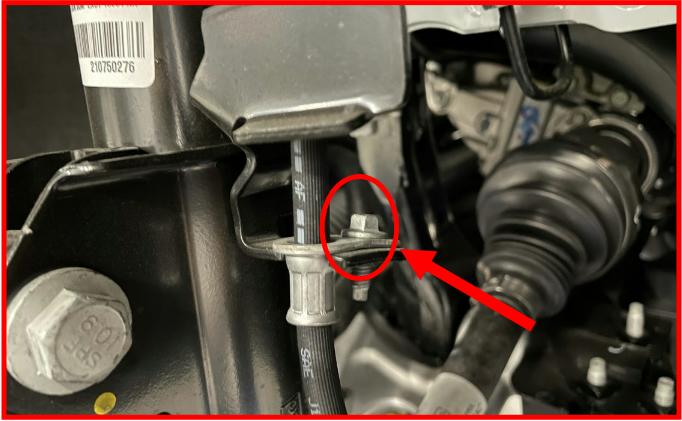
Do not disconnect any hydraulic brake lines.
Retain factory hardware
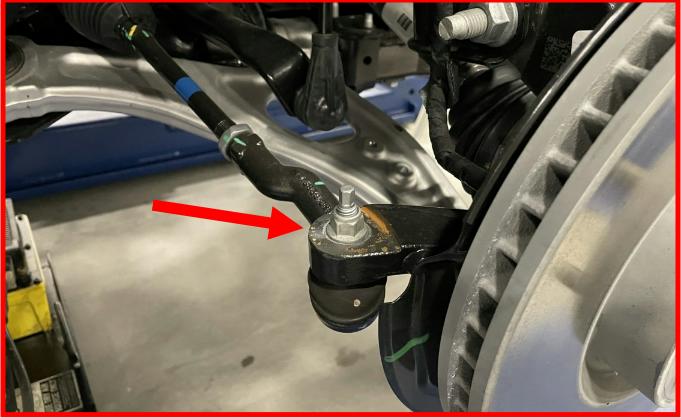
Remove the 15mm tie rod nut.
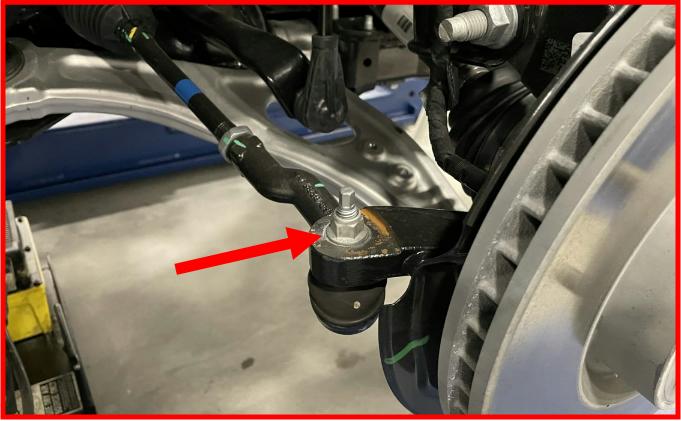
Retain factory hardware
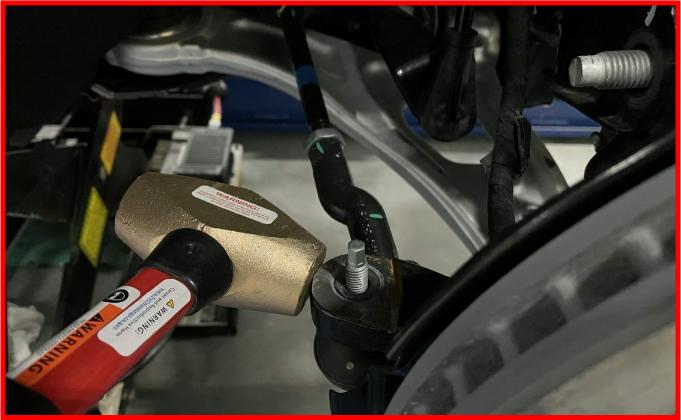
Strike the side of the steer arm to remove the tie rod from the knuckle.
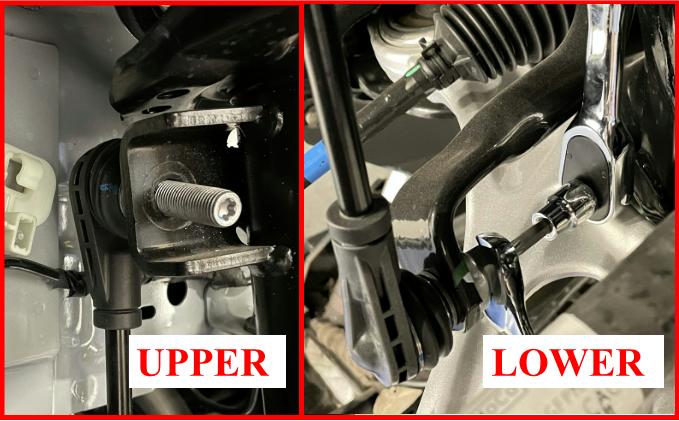
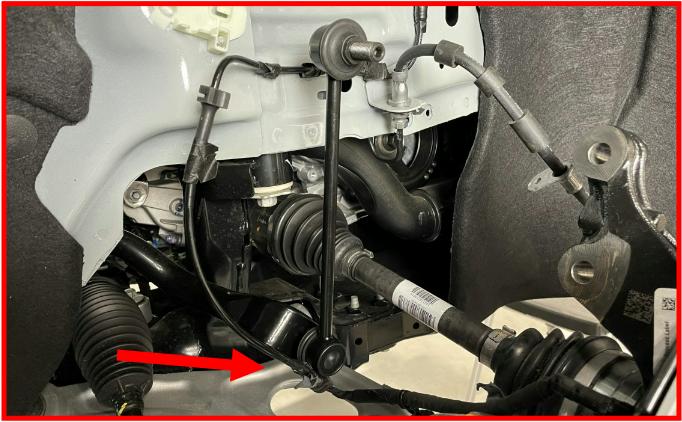
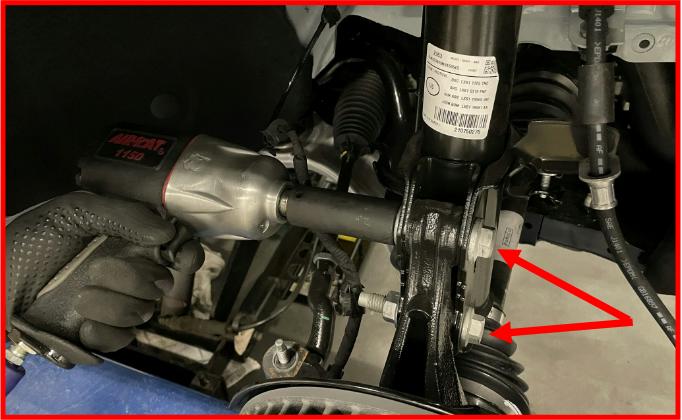
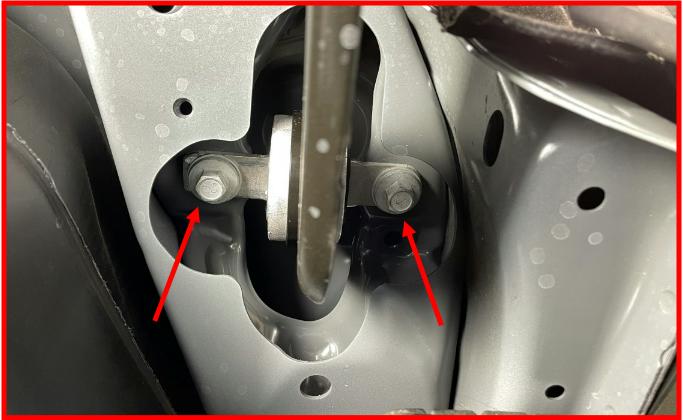
Remove and discard the factory end link from the vehicle using an 18mm socket/wrench and a T40 Torx bit.
Upper and lower nut shown.
Remove the metal clips retaining the wiper cowl.

Retain factory hardware.
Lift up the cowl and remove the two 10mm bolts retaining the strut cover.
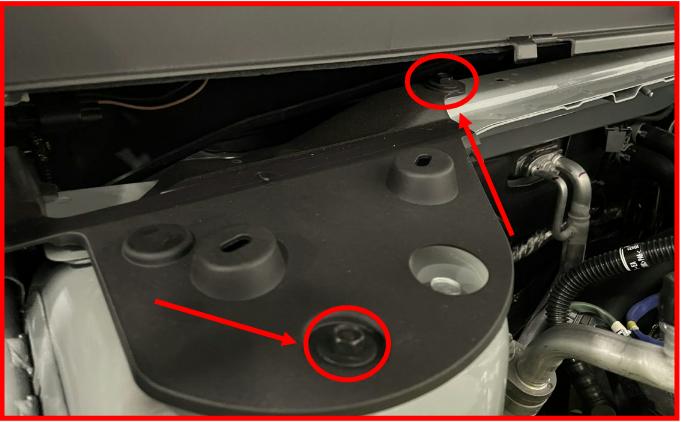
Retain factory hardware.
Remove the 21mm lower strut nuts on the knuckle.

Retain factory hardware.
Use a hammer to remove the bolts from the knuckle.

Retain factory hardware.
Support/ hold the strut to prevent it from falling and remove the 13mm upper strut bolts from the engine bay.

Remove strut from the vehicle.
Retain factory hardware.
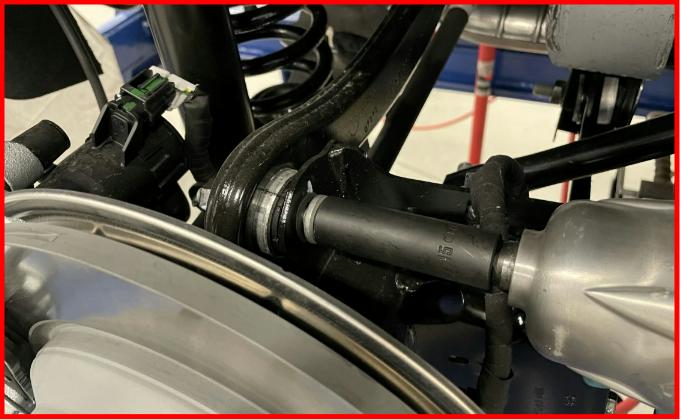
Locate the 9.25” End Link. Install using the supplied nut with a 15mm wrench. A 5mm Allen may be needed if the end link joint starts rotating in the cup.
Torque to 60 ft-lbs
Using a sanding disk, grind down the inboard edge on the bottom of the strut so it’s flush with the strut body.
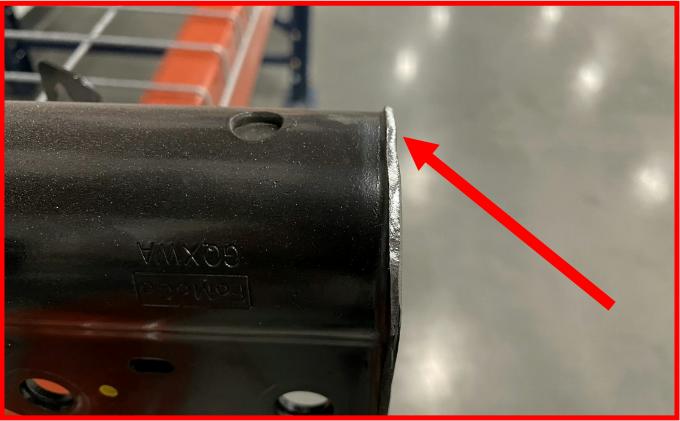
Coat exposed material with a rust inhibitor to prevent corrosion.
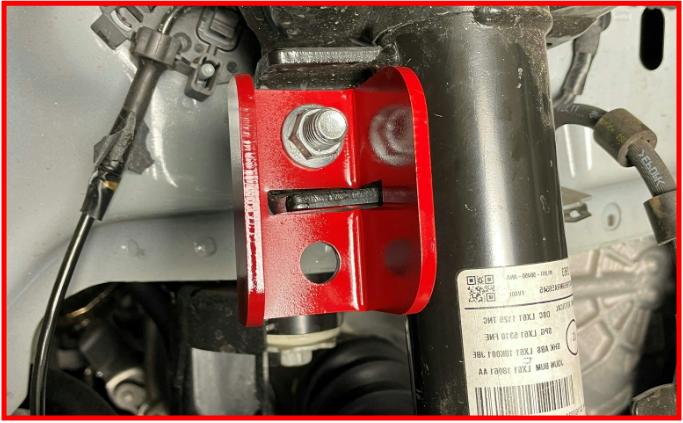
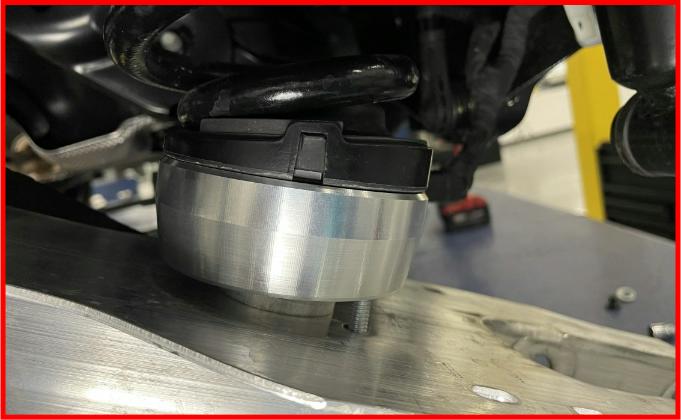
Install the Front Strut Spacer using the factory bolts.
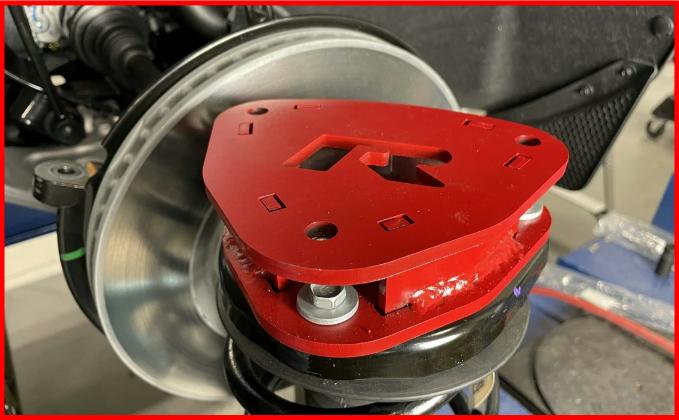
Spacers are identical and strut bolt pattern is asymmetric, allowing only one installation orientation. Tighten bolts evenly until spacer is flush to strut.
Torque to 30 ft-lbs
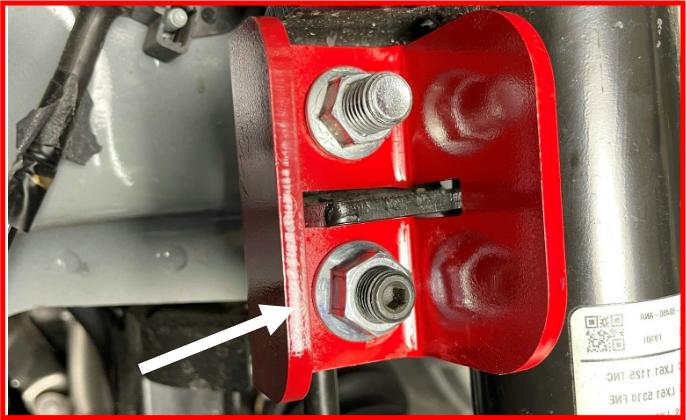
Install the strut and Front Strut Spacer assembly into the vehicle using the supplied M8-1.25 x 25mm Serrated-Flange bolt.
Do not tighten at this time.
Install the knuckle bolts using factory hardware.
Torque to 80 ft-lbs
Install the End Link Drop Bracket using the supplied M12-1.25 x 30mm bolt and M12-1.25 Flange Lock Nut Make sure the bolt is installed inboard to outboard.
Torque to 60 ft-lbs
Mount the End Link to the End Link Drop Bracket using the supplied hardware.
Torque to 60 ft-lbs
Using factory hardware, reinstall the tie rod.
Torque to 30 ft-lbs
Repeat this process on the others side of the vehicle.
Reinstall the wheels. Lower the vehicle and torque the strut bolts to 20 ft-lbs.
Torque the wheels to manufactured specifications.
Rotate the wheels lock to lock to verify that there are no clearance or binding issues.
Trim and adjust as necessary.
REAR INSTRUCTIONS
Block the front wheels for safety.
Raise the front of the vehicle and support with safety jack stands on the factory lift points.
Remove the rear wheels.
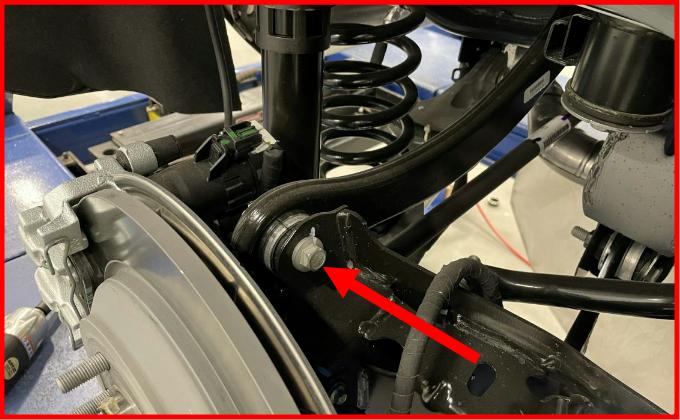
Remove the end link nut using an 18mm wrench and a T40 Torx.
Retain factory hardware.
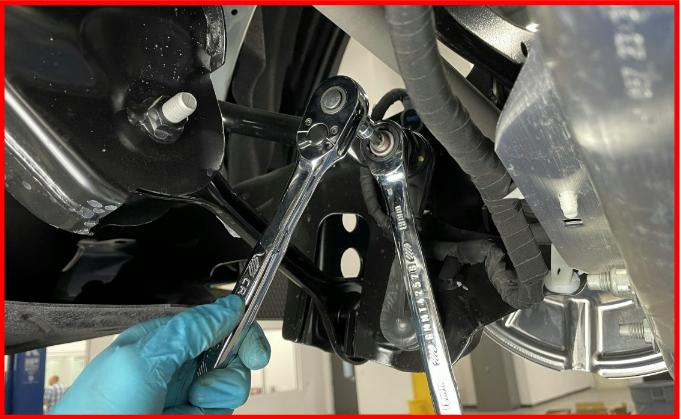
Loosen, but DO NOT REMOVE, the upper control arm 15mm bolt.
Loosen, but DO NOT REMOVE, the rear trailing arm 15mm bolt.
Support the lower control arm with a suitable jack.
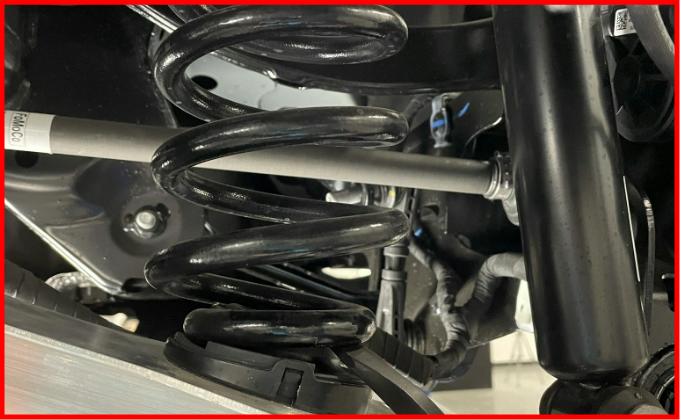
Remove the 15mm Strut and knuckle bolts from the lower control arm. Let the control arm and brake assembly hang.

Retain factory hardware.
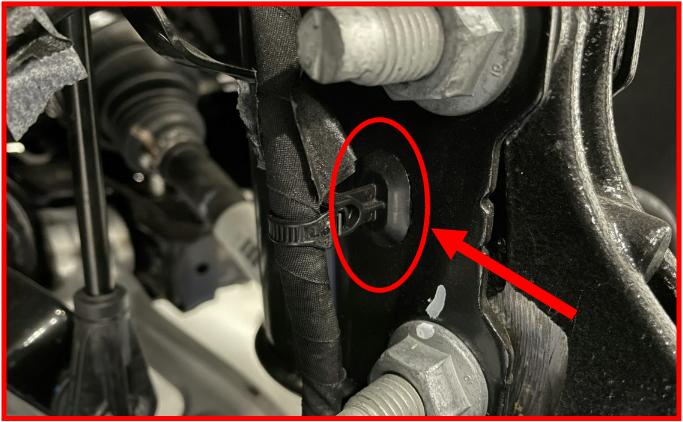
Use a trim removal tool to remove the ABS wire clip from the lower control arm.
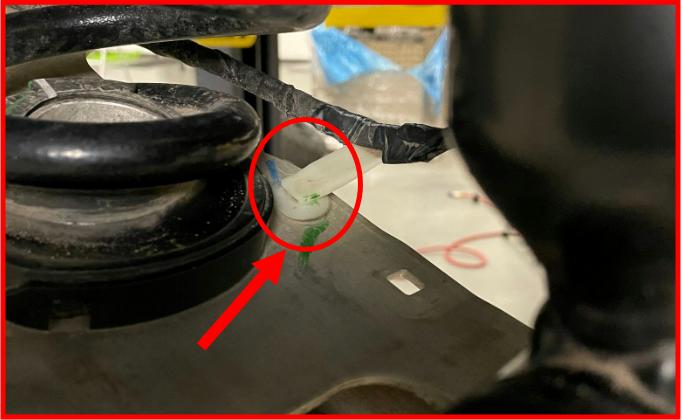
Carefully remove the spring from the lower spring isolator. A pry bar may be needed. Let the spring hang.
Carefully use a prybar or flathead screwdriver to remove the spring isolator from the lower control arm.
Retain factory hardware.
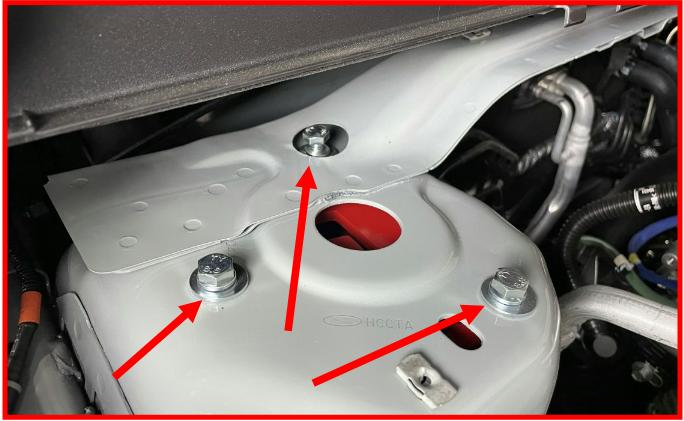
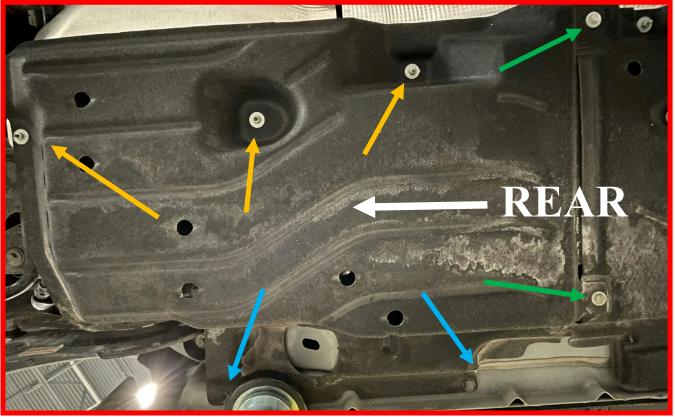
To access the trailing arm bolts, lower driver side the sound dampening liner by removing the three 10mm nuts and two screws.
Use a flat head screwdriver or a trim removal tool to pop open and remove the two trim clips.
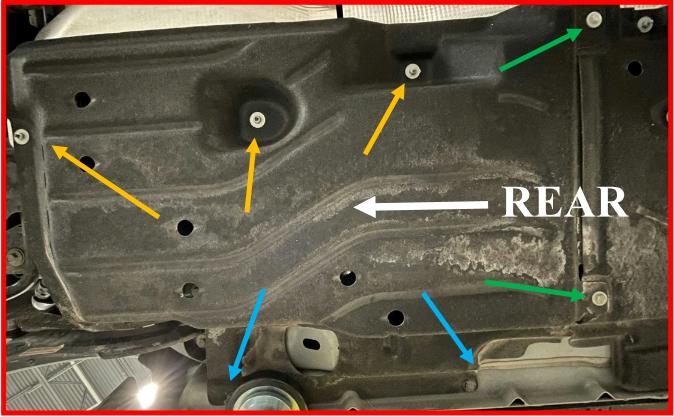
Retain factory hardware.
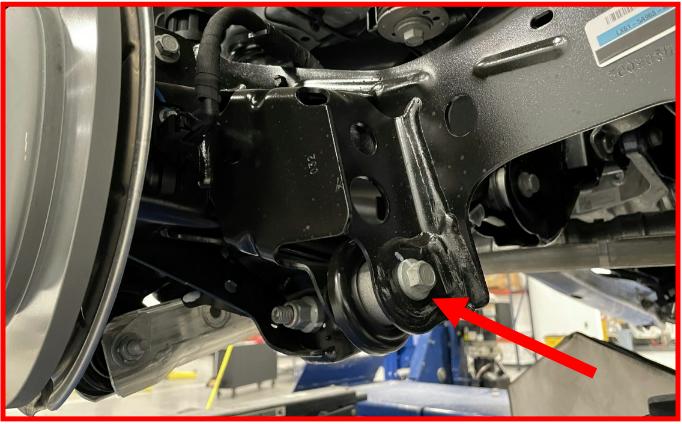
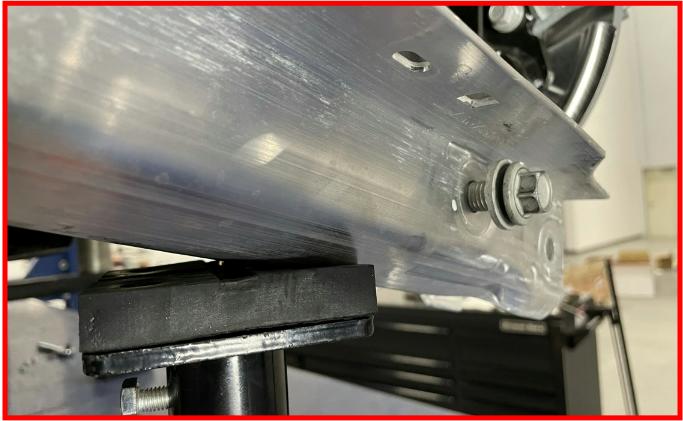
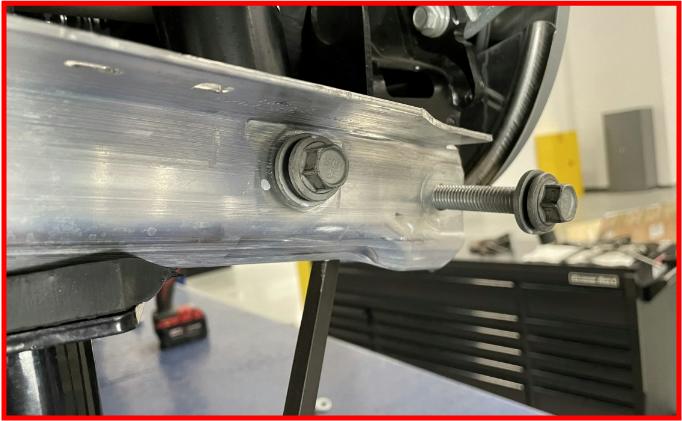
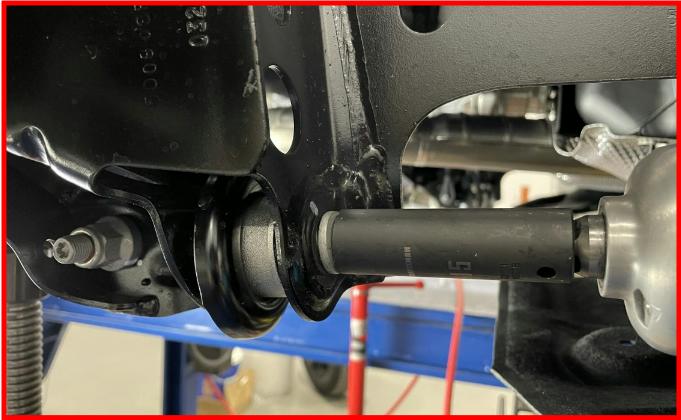
Remove and discard the two front 15mm bolts retaining the trailing arm.
Install the Rear Trailing Arm Spacers between the chassis and trailing arm.

Bolt in the trailing arm using the supplied M14-2.0x60mm bolts, M14 flat washer, and lock washer.

Do not tighten at this time
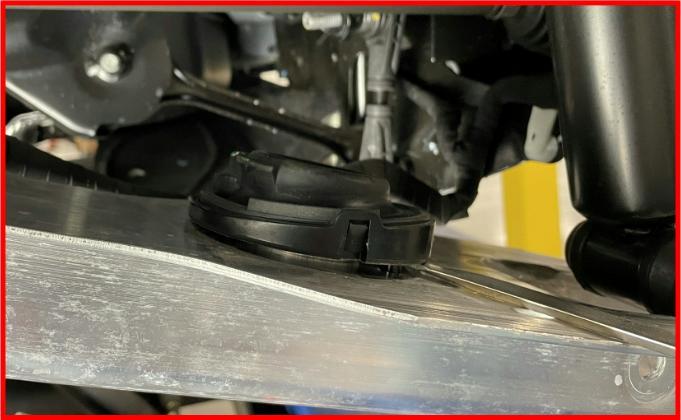
Install the Rear Strut Spacer and factory spring isolator.
Using a jack, carefully lift the lower control arm until the factory strut bolt and lock nut can be installed.
Install from the rear forward.
Do not tighten at this time
Continue to carefully lift the lower control arm until the factory lower knuckle bolt and lock nut can be installed. Be careful to not lift the vehicle off of the jack
stands/ lift.
Install from the rear forward.
With the lower control arm loaded from the jack:
Torque the upper control arm hardware to 80 ft-lb.
Repeat this process on the other side of the vehicle.
Reinstall the wheels. Lower the vehicle and torque the wheels to manufactured specifications.
FOR BOTH SIDES:
Torque the front trailing arm hardware to 80 ft-lb.

Torque the rear trailing arm hardware to 80 ft-lb
Torque the factory end link hardware to 35 ft-lb.

Return sound dampening liner to its original position. Reinstall the factory nuts, screws, and trim clips.
WARNING
FAILURE TO PERFORM THE POST INSPECTION CHECKS MAY RESULT IN VEHICLE COMPONENT DAMAGE AND/OR PERSONAL INJURY OR DEATH TO THE DRIVER AND/OR OTHERS.
FINAL CHECKS & ADJUSTMENTS
Once the vehicle is lowered to the ground, check all parts which have rubber or urethane components to ensure proper torque. Torque lug nuts to the wheel manufacturer specs.
Move vehicle backwards and forwards a short distance to allow suspension components to adjust. Turn the front wheels completely left then right and verify adequate tire, wheel, brake line, and ABS wire clearance. Test and inspect steering, brake and suspension components for tightness and proper operation. Inspect brakes hoses and ABS lines for adequate slack at full extension, adjust as necessary.
RECHECK ALL HARDWARE FOR PROPER TORQUE VALUES AFTER 500 MILES, AND THEN PERIODICALLY AT EACH SERVICE INTERVAL THEREAFTER.
VEHICLE HANDLING WARNING
Increasing the height of your vehicle raises the center of gravity and can affect stability and control. Use caution on turns and when making steering corrections.
Vehicles with larger tires and wheels will handle differently than stock vehicles. Take time to familiarize yourself with the handling of your vehicle.
WHEEL ALIGNMENT / HEADLIGHT ADJUSTMENT
It is necessary to have a proper and professional wheel alignment performed by a certified alignment technician. Align the vehicle to recommended specifications. It is recommended that your vehicle alignment be checked after any off-road driving.
In addition to your vehicle alignment, for your safety and others, it is necessary to check and adjust your vehicle headlamps for proper aim and alignment. If the vehicle is equipped with active or passive safety/collision monitoring and/or avoidance systems including, but not limited to, camera- or radar-based systems, check and adjust your vehicle’s systems for proper aim and function.